Elevating the Art of Guitar Repair


Text For Repairs and Setups : ( 519 275 1008 )

Precision work / Fast turn-around / Best price \m/ !


Remi Boucher / Stratford


Remi Boucher test driving his Hilhorst Classical
 after fret dress/ edge dress / new intonated
 bone saddle and overall setup.
It is always a real "physics lesson" to see the amount of fret wear
this man can generate with nylon strings 
 .... chewing up the nickel /silver fret wire !


Remi Boucher guitar setup


The private recital that Remi gave 
 last night, as always, was a real eye-opener to the first time fans !!
My thanks goes out to both Stephanie and Michael
for once again, hosting this very special event
and all who came out to support
Remi's return to Stratford.  

Free Gibson Hummingbird Restoration Tutorial


76' Gibson Hummingbird
#gibsonhummingbird


Completed Gibson Hummingbird Restoration

The pictures are not necessarily in order ....
but I hope that this sheds some light on the overall procedure for everyone.
Cheers,

Michael


Oddly enough, from the factory ... this guitar was shaded on one side only  !?

In the picture below, you can see the red colouring on the treble side but absolutely no shading on the bass side ... bizzare !


After a neck reset / compensated nut / compensated saddle /
 fingerboard levelling for the new ( proper ) neck angle /  
and fretted .... it never in it's lifetime 
played or sounded anywhere near this good  !! 


Nut blank made of tusq / Brazilian rosewood veneer


Original nut and finished compensated nut ( below )


Fingerboard levelled for new neck angle after reset.


Heating up glue for fingerboard extension with two 60 watt bulbs


Heating up hide glue for dovetail.


When I do a neck reset,
I use carpenters glue for the fingerboard extension
 and hide glue for the dovetail. 

I like to heat up both glues and the wood for maximum adhesion.

Timing is everything when setting up for this gluing operation !  


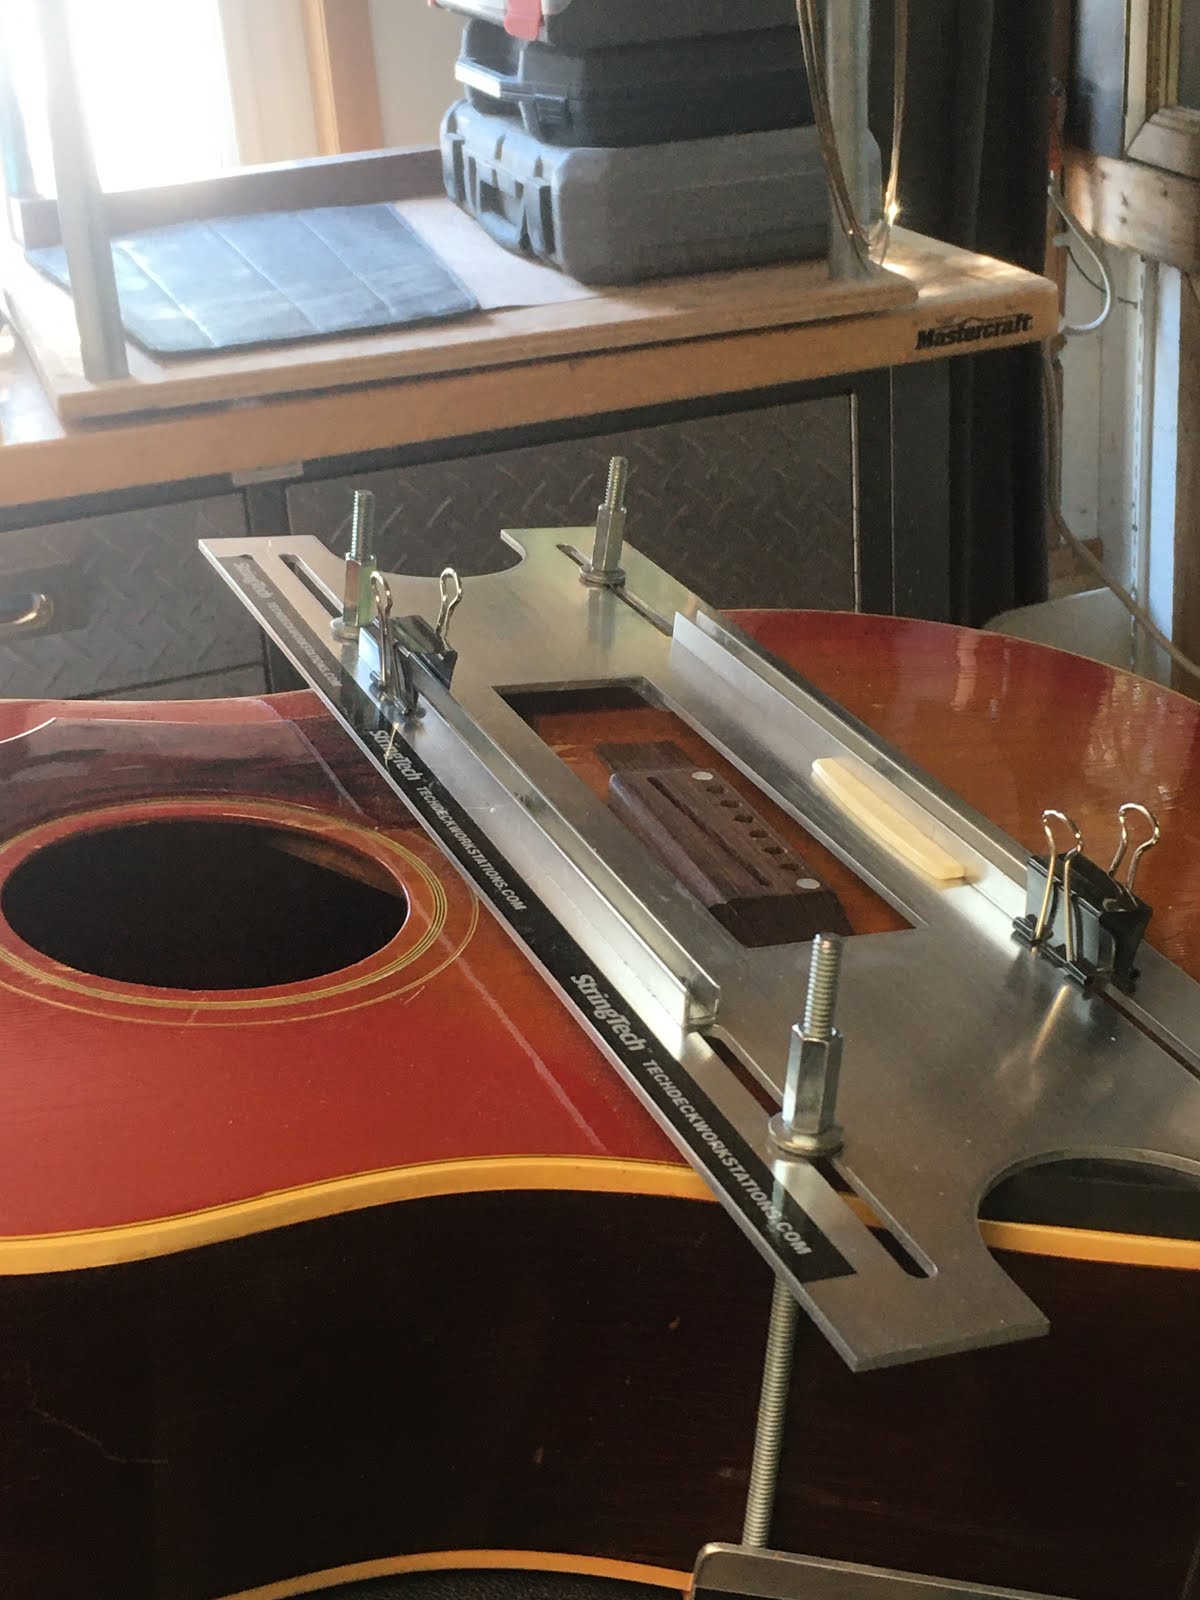
Clamping configuration for re-gluing neck / fingerboard extension.


The curved wooden caul for the fingerboard extension
applies the clamping pressure evenly.


This is the set up for steaming off the neck.

The TechDeck neck assembly catches the neck when the joint lets go ! 


This relief cut on the lower part of the heel,
with a .010" razor saw, allows the dovetail to release more
easily, and reduces the likelihood of pulling off the finish at the neck to body junction. 


I strap the neck down on the TechDeck neck assembly
and flip it up vertically to give me clear access
to the heel cheeks and dovetail in order to adjust
the neck to body angle for the reset. 

This neck came off nice and clean ...
right on the glue line ... beautiful !


New frets installed .... waiting for compensated nut.


It is my hope that this helps to clarify the procedure for everyone.

Guitar Repair Courses

#guitarrepairtechnique


This severed headstock ( destined for the garbage can )
was pinned and glued this week in
preparation for slicing and splicing in next week's class.  


Rowan cleaning up the excess hide glue, while it is still soft, 
after steaming off the neck on this 60's Harmony guitar.


Everyone had a front row seat for the neck removal procedure. 


This clamping configuration, and a steam injection needle
( Browns Guitar Factory   ... thx John ! )
 made quick work of this job. Once the clamping configuration
and "dry run " was done;
the neck came off cleanly and safely in about 25 seconds.


Bob is truing up the fingerboard
before dropping in the new frets
on this custom Warmoth swamp ash 
Tele (TM) "Parts-Caster" that he is building.  


Bob brought another beautiful Warmoth Tele to class
to line up and install the Wilkenson Trem Bridge,
  fit the neck to the body
cut and install a compensated nut
 and did a complete fret installation.
This was one of 4 different "kit guitars"
that he put together during the
Level 1 and Level 2 courses. 


Rowan's 12-String Guild had the bridge removed
and re-glued and a new compensated bone saddle cut last class. 


65' Tele Neck Restoration

#vintagetele


This post is dedicated to all of my students, past, present and future. The faith and encouragement you have shown is a constant inspiration for me to "raise the bar" in every way possible so that all of us, collectively,  continue to "Elevate the Art". 

With Sincere Gratitude ... Michael
  
This is a pictorial / tutorial on a 65' Telecaster neck restoration. 
 It sat in a closet for 18 years !
The customer had explained that he had been to numerous places to try and get it restored but had never felt comfortable leaving it with anyone 
( understandably ) after the last guy to work on it,
had stripped the truss rod threads, rendering the neck " unadjustable".

When I explained in detail, precisely what steps I would take to restore this neck; he ( nervously ) agreed that the only other choice was to put it back in the closet for another 18 years.... or get it fixed !  


Job Completed ( minus the string tree)

Brazilian Rosewood repair piece close to final levelling

Re-Slotted for Fret


There are a lot of things that are not original ... the guitar was stripped and refinished clear, the headstock was reamed out and schaller machine heads were installed, some fingerboard markers were changed, it was refretted ( pretty decent job ),  a second string tree was installed and the customer painted the original pickguard black. This was all done many years ago, when the true value of  instruments like this, wasn't really understood. These things could be reversed, but the customer is so happy to have a "playable guitar " after all these years that he isn't in any hurry to get any more work done at this stage. ( Can't say that I blame him )


Replacement Brazilian rosewood piece ready for gluing

Hot hide glue fills the threads and cavity as well as adhering the rosewood to the maple.

Curved caul, used to clamp rosewood while gluing.

The replacement Brazilian rosewood piece, glued and ready for levelling. 


A combination of a damp cloth and a hair dryer allowed me to carefully separate the rosewood from the maple. 


The original truss rod was (very carefully) severed with a mini spherical metal burr after gaining access by removing the rosewood from the leading edge of the nut to the first fret slot. The original truss rod was then pulled out and the new stainless steel truss rod was threaded into the original square nut.

Stripped truss rod threads


Old and new truss rods


Fastener configuration used to install the new stainless steel truss rod.
(Sorry ... for the slightly out-of-focus shots.
If you have any questions ... send me an email me and I'll clarify ) 


Guitar Repair and Design Course


Guitar Repair and Design

Courses now available online.
 Level 1 and Level 2 courses 
with a rewind button !!


Michael McConville on 
Patreon.


Synopsis:

This Video Library course will provide students with hands-on training in the set-up and repair of acoustic and electric guitars. A detailed study of fretwork technique, including safe fret removal, correcting the lay of the neck, fret levelling, re-crowning and polishing; the fabrication of hand-cut nuts and saddles and an overview of the basic physics and design of the various members of the guitar family. All of the elements that determine the instrument's ability to perform at it's optimum level of playability will be covered. The students will develop the ability to accurately set up guitars and to level / edge dress / and refret the fingerboard. Discussion of the business aspect of guitar repairs is also covered for those that are interested in 
working on instruments to generate a part time or full time income. 


Neck Reset/ Refret on 60's Harmony acoustic
If you look carefully, you'll see the hockey puck.
A sure sign of the Canadian version of the Guitar Repair Class Semi-finals !


Dave ( Innisfil), managed to complete a neck reset (steaming off the dovetailed neck), slipped off the bridge / re- radiused the foot and cleaned up the soundboard surface and reglued, completed a refret ( including levelling the fingerboard ), cut a compensated nut from a tusq blank, re-slotted the bridge and cut a custom fit tusq intonated saddle !


Guitar Repair Workbench


Guitar Technician Training

Special thanks goes out to all of the students from across the Province; especially those who have driven to Stratford each week  from Leamington, Windsor, Barrie, Woodstock,  St.Catherines, Oakville, Georgetown, Cambridge, Kitchener-Waterloo, St Agatha, Toronto, Ajax, Lindsay, Niagra Falls, Goderich, Sarnia, Listowel, Peterborough, London, Long Point, Alymer, 
Guelph, Acton, Hamilton, Wingham, Dundas, Owen Sound, Chatham, Mississauga and Brampton to my former classes. 

Now these classes are on my Patreon Channel 
A Masterclass with a rewind button !


It has been very encouraging and rewarding to see so many of you spreading out across the Province and setting up shop.
My wish for all of you, is continued success in the coming years, with all of your guitar-istic goals and aspirations. 


This past 25 years, has been a testament to the conviction and dedication of all my students. The attendance record and enrolment,  has demonstrated the obvious need in the Industry, for qualified people. My gratitude goes out to all of you, for your faith, and encouragement.